Transform Windows 7 into XP with XP Skin Pack

How many of you wants XP look for Windows 7, nobody wants to use old and outdated technology of course we’re only changing the look here, specially Windows 8 Beta release round the corner which may release in February. XP Skin Pack  released by Hamed transforms Windows 7 into XP. You should know after this skin pack installation logon screen, cursor, desktop, explorer, dialog boxes, visual style of Windows 7 transforms into XP.

Download the program zip file, extract its contents to a folder and run the skin pack executable. Choose Custom installation during the setup and uncheck for all three options under it some IncrediBar crap nobody wants. Click Next to complete the installation, you need to reboot after that.image

After reboot you’re on Windows XP kind of like that.  Make sure to create restore point and backup necessary files before installing this skin pack helpful incase to get back to previous state. Do uninstall any skin packs if any installed on your Computer.

Uninstalling XP Skin Pack

During the uninstall, you can select Files, Extras and remove Uninstaller and Backup files a quick restart brings back Windows 7. Everything went fine on your system we installed and uninstalled successfully.


XP Skin packs supports Windows 7 and 7 SP1.

Download XP Skin Pack

Download Bulk Images from Google Images With Multi Image Downloader

If you wish to save images of your favorite celebrities from images.Google.com it will be much difficult to save bulk images shown on a single search page as user has to reach original image page to save that image to his computer,instead Multi Image downloader downloads bulk images shown on Google Images Search easily to your hard drive. image

How Multi Image Downloader works

Multi Image downloader helps user by downloading bulk images on Google images search which avoids user visiting multiple sites to save images to his Computer.This program will parse the Google images pages for source image references and downloads images in short span of time.

#1.Open Google images in your browser, perform the search for images you are looking for.

#2.Download and run Multi Image downloader in your Computer, in Multi Image Downloader program window paste the first page URL of the Google Images you searched for under “Google images” Page URL.

#3.Click Set Folder to specify the location to save images into your Computer.

#4.Now click Get image links will download and list links of exact image references , select all or some of the links and click download to let the program save all images to your computer hard drive.

Multi Image Downloader is freeware.

Download Multi Image Downloader 1.2.3.3

How to find and Delete Duplicate Photos in Your Computer

We Unknowingly copy duplicate pictures along with original ones some times, these duplicate pictures may occupy large space though these days hard drives with larger capacities being used to store photos and videos.People avoids to find and delete these duplicate photos fear of they may delete original ones, where VisiPics free program finds and deletes duplicate pictures from your computer very easily.

image

VisiPics with simple user interface looks for identical files , if user selects folder then it applies five comparison filters to measure how close pairs of images on the hard drive are.

Download and install VisiPics in your Computer, run the program add folder of pictures you want to find duplicates by clicking Add folder from File menu.Click Play button in VisiPics user interface to let it scan for photos,Visipics will show duplicate pictures found on the left pane with mentioning number of duplicate pictures and duplicate groups on the right pane.

You can press Ctrl and click duplicates shown on the left pane which are marked for deletion with Recycle Bin icon, from Actions menu clicking Delete button will remove all duplicate photos.Clicking the picture on the left pane will show the preview of it on the right pane.

VisiPics features

  • VisiPics is freeware and works faster than any other commercial product.
  • Highly efficient results with adjustable similarity levels.
  • Show the previews of all duplicates which makes it easy for the user to select and delete particular duplicate.
  • Starts to display results while scanning as user don’t have to wait for deletion of pictures.
  • Detects two different resolution of same picture as duplicate, detects same picture of different formats and also finds duplicates with  minor cosmetic changes have taken place.

Download VisiPics

Kobian launches iXA Tablet PC at Rs. 3,999

The Indian market is flooding with budget tablets these days. Last month we saw quite a few budget tablets such as Micromax Funbook, HCL ME Tab U1, UbiSlate 7C, and others launching in India. The latest entrant into the budget tablet race is Kobian, which has launched an Android-based budget tablet called iXA Tab. The device, priced at Rs. 3,999, will be available for pre-order from May 23.

The iXA Tab runs on Android 2.3 Gingerbread operating system and is powered by a 1GHz processor. The new Kobian device comes with 512MB of RAM and has 4GB built-in storage, expandable up to 32 GB via microSD card. It has a seven-inch touchscreen. The iXA Tab supports Wi-Fi for connectivity. It also has a 0.3MP camera.

Moreover, the iXA Tab supports a wide range of audio formats such asmp3, wav, wma, aac etc. It also supports video formats such as avi, mp4, mov, 3GP and many more video formats supported by iXA Tab.

Sushmita Das, Country Manager - India, Kobian Pte Ltd says, "We have had immense success with mTab range , the launch of iXA Tab is for our young students and generation who would want to have the ownership of a tablet . They are now able to get all the features bundled in one product with a very attractive price tag. Since it's based on Android Gingerbread, user has the access to all Google applications and can have the ultimate experience. If one can get a Tablet at the price of a mobile phone then why not grab it."

It's notable that the iXA Tab is a limited edition product from Kobian. Availability of the device will be announced on the day booking starts.

Kobian had forayed into the Indian last year with its Mercury series. Since then it has launched quite a few Mercury tablets including one with the latest ICS operating system. Last month, Kobian launched Android 4.0 ICS-based Mercury mTab Neo2 tablet. The The Mercury mTab Neo2 is powered by a 1.2 GHz Cortex A8 dual-core processor, 512 MB RAM. It has 7-inch (16:9) capacitive screen. Notably, it comes with SIM calling function like mobile phones and has Bluetooth, WiFi, and GPS for connectivity. It has dual cameras (front and rear-facing) as well.

Wishtel Launches Ira Low Cost Android Tablet at Rs. 4000

Looks like there is tough competition for Aakash 2 tablet now days, as Wishtel launches couple of cheap Android tablet starting from Rs. 4000. Wishtel launched two new low-cost Tablets with some unique features like support for Indian languages (Hindi and regional languages).

Wishtel comes up with three variants named Era, Thing and Icon. The base model Ira priced at Rs. 4000 runs on Google Android (2.2) os, it has 7.0 inch resistive Touch Screen. Era has Wi-Fi and external USB modem support to access internet.

IRA Tablet Priced at Rs. 4,000 aka Era Tablet

image

Ira is powered by an 800MHz processor with 256MB of RAM. Internal memory of this tablet is 2GB however expandable with SD card up to 32 GB. It has one USB 2.0 port and a Trans Flash (TF) card reader.

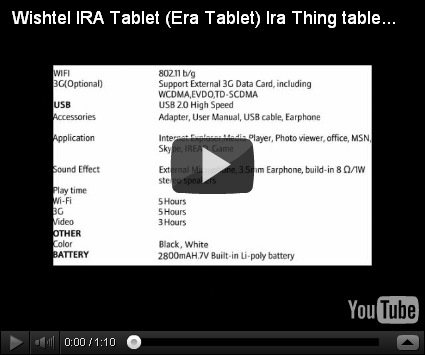
Wishtel ira specifications: Era tablet

image

IRA Thing Tablet Priced at Rs. 5,500


image
Wishtel Thing features a 7 inch TFT LCD (800×480 pixel resolution) capacitive  Touchscreen display and runs on Android 2.2  OS.

This tablet is also powered by an 800MHz processor but has more powerful  512MB of RAM. Internal memory  is twice than Era tablet 4GB . There is WI-FI  and external Modem connectivity option same like Era tablet.

Thing has more powerful battery back up than older Era it has 2800 mAh battery which gives 3 hours running time as company claimed.

Wishtel IRA ICON Tablet Video demo

Wishtel also planning to launch IRA ICON tablet which runs on latest Google Android 2.3 os. Ira Icon Tablet  is powered by 1.2 Ghz cortex A8 processor. Tablet has 7″ Display With Capacitive Touch. It also features Gravity Sensor and 4000 mah battery capacity which delivers 6 Hours battery back up. This tablet features built-in 3G sim slot and Wi-fi connectivity to access internet.

Wishtel IRA ICON Tablets Specifications :

image

BOOK YOUR TABLET HERE

One can buy this ira Tablet online from official website of Wishtel, however only ira Thing model is available to purchase online at Rs. 5,500+Taxes+Shipping Charges.

Top 5 Google Adsense Approval Dirty Tricks

Hi Visitors you know Google earns $761.71 in one second and its annual revenue is near $23,800,000,000. It simply provides ads which is only put on website or blog and its pay when any one click on its ads.But its hard to get Adsense account because google conditions are very tough.According to these conditions you should have a top level domain,domain is 6 month old and website should completely developed and contain original material.But if you want Google Adsense account in under 1 day or in 6 hours by legal and genuine way then you are in right place. I will mentioned here few steps one by one you can choose any one that you want and can easily get your Adsense account.

Method 1:

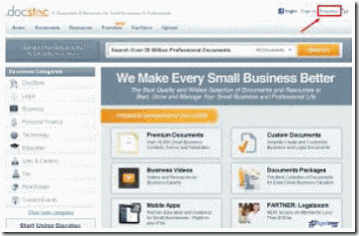
  • DOCSTOC go here and click on register.

docstoc home page

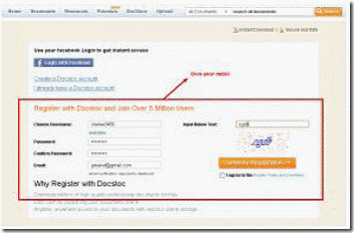
  • Fill your detail here and click on complete registration

docstoc signup

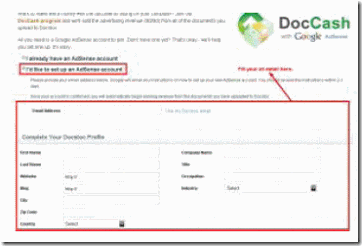
  • After that it will ask you about google adsense account.
  • Click on “I would like to set up an account ” and fill all detail.
doc cash
  • Finally it will send instructions in your mail you just follow instruction and you will get Adsense account in 6 hours or in 24 hours.

Method 2:

This is also one of the best method to get adsense account.This method has been mentioned probably 100 times, but i will be using a twist to make this work.

1. Make a new gmail account.

2. Now go to Ezine Articles site or any article site you want and then choose a niche (make sure it’s popular).

3. Go to blogger.com and register a new blog ‘make sure a title and domain name you choosing is related to your niche’ and select your theme.

4. After that copy 5 articles related to your niche and paste in to your blog one by one in the form of post.

5. Make sure Articles are well formatted and have space between paragraphs.

6. Most people go to google.com/adsense and signup, but the twist is to signup directly from blogger. Once you have about 5 well formatted articles then you should see “Monetize” in the tabs section.

7. Click signup for adsense.

8. You will have 4 options now, choose the 1st one which is “Display ads in my sidebar and posts”, so when you fill up the form you will see Adsense advertisements right away.

9. Fill in the required detail, correct and genuine detail.

10. My favorite, wait about a day or two (usually less than 12 hours) and you will get approved.


Method 3:

  1. Go to Bukisa and register for new member.
  2. Confirm your email to complete your register.
  3. Download one or some free e-Book from any search engine, like example use Google.
  4. You can use some topic based from your interest like Money Online or anything.
  5. Now copy and paste those articles from that e-Book to Bukisa.
  6. Submit minimal three contents, and wait until they accepted.
  7. Some time the site is in heavy job and approve the articles after 2 days.
  8. Soon you will get Bukisa mails that inform your articles have approved.
  9. After getting approved article apply for Google Adsense by this way.
  10. Bukisa may ask you if you already have Google Adsense Account and then tick no.
  11. Next, enter your e-Mail Id that you have given at the time of bukisa sign up.
  12. Last, you will get a link in your e-mail and that is for your Google Adsense.
  13. Fill it and be sure that the info you will give to them must match with Bukisa.
  14. And done, You will get email from Google Adsense that your account is approved.

Method 4:

Follow the below mentioned steps and you will get Adsense approval in just 2 days.

  1. Go to Flixya
  2. Register and complete ten contents.
  3. It may be photo, blog, article, and video.
  4. After that once you make your current account with this site you will get a fresh form in the second step, the Google Adsense sign up form. Input your valid e-mail address to start a Adsense account. We prefer G-mail regarding far better results.
  5. After you sign up it gives you a publication Id and then after 1-2 days your account will be approved

Method 5:

Unless you have any videos or even PPT presentations to talk about for the above site next i've one more strategy to get you approval with Adsense in mere two days

  1. You all may be aware of Indyarocks, the 1st step is to go to Indyarocks and the first step should be to visit Indyarocks and apply for an account with them.
  2. Once you register, sign in to your current account plus check out earning link around the right sidebar inside your profile.
  3. Indyarocks is a channel associate with google adsense that makes it possible to to earn income with them by sharing and also generating blogs. And you must satisfy their following conditions for adsense approval. Note the below mention conditions of indyarocks to get full filed for adsense approval. Your own Profile should be at least 80% complete.
    • Your profile privacy should be set to everyone.
    • You have to publish as a minimum ten photos for your profile and also the privacy from the photos should be set to everyone.
    • You need to posting at least 2/3 blogs and also the articles needs to be unique and also the privacy from the blogs should be set to everyone.

How to register Domain name @99/- only

Register your favorite domain at 99/- only. Including hosting. To setup follow step-by-step process:

1. Open Bigrock.in and signup

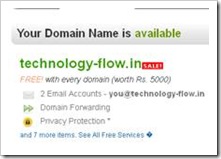
2. Enter your choice of name as domain name in the “Get a Domain Name” box and choose “.in” then click GO.

clip_image002

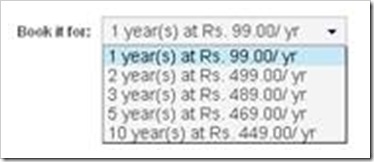
3. Then choose your plan in book it for

clip_image004

4. Then click on “Continue (Proceed to Cart)” (Here I am explaining with 1 year plan)

clip_image006

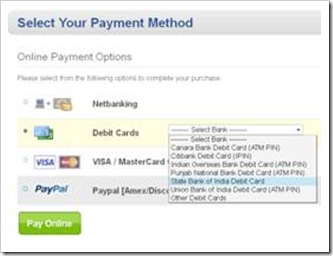
6. Plan will be add to your account. Then select the payment options. (Here providing-Netbanking,Debit Cards (ATM card), VISA/MasterCard/Credit cards, and Paypal). Here I am explaining with Debit cards option, because moost of the peoples have this. Select Debit cards and select the Bank name then click on “Pay Online” button

clip_image008

7. Here I have selected “State Bank of India Debit Card” then click on “Pay Online”

8. After the above Step 7, your page contain ( do not press the BACK or REFRESH button of your browser)

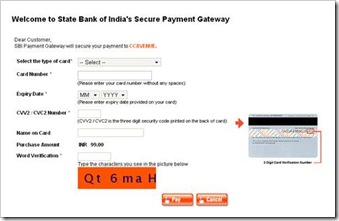
9. State Bank of India site will be open

clip_image010

10. Fill the above form and eneter Word verification then click “Pay” button.

11. The site will be redirect to “CCAVENUE” then next page will ask ATM PIN (Personal Identification Number) number. Enter securly in the given filed.

12. Your domain registration Completed.

13. Just check your mail for conformation mail.

14. Your favorite Domain Name is ready.

15. It takes around 10 to 15 minutes.

Note: Do not forget to Update Antivirus/Security suites in your system.

Do not press BACK button in your browser and REFRESH button.

How To Add BigRock Domain Name To Blogger?

You will find many tutorials and advice and articles related to switch to Custom Domain name for your your blogspot blog and i completely agree with that, it has many advantages so you should opt for that and my personal favorite is “BigRock” its very good domain name registrar and my domain name is registered there only. you can get your domain name at Rs 85/- only its the lowest price so why not to  go for that but sometimes you will find difficult to configure your newly purchased domain name but not to worry this tutorial will explain you how can you add BigRock (or any other also) domain name to you blogger blog, so let’s start with the tutorials.

How To Add Domain Name To Blogger?

Affiliate link here

  • First login to you account (http://manage.bigrock.com).
  • Click on Domains and then click on List all orders.
  • Select you domain name.
  • Than from the menu tab click on “DNS”.

clip_image002

  • Now click on Manage DNS.
  • Now basically you have to add two records to your DNS records (CName and A Records).

clip_image004

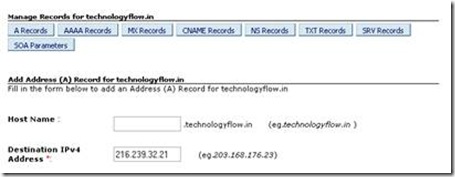
  • Now click on “Add A Record”.
  • Now in Name field leave it blank.
  • In destination IPV4 address put this value “216.239.32.21” (without quotes).

clip_image006

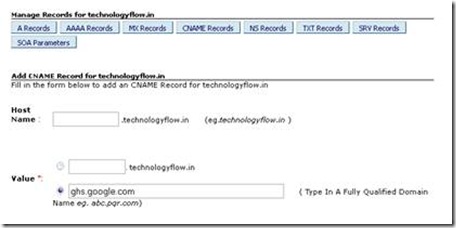
  • Now click on add Cname record.
  • In Name field enter “www”.
  • In Value enter “ghs.google.com”.

clip_image008

  • And click ok or what ever may be the option there.

That’s it you are done with modifying your DNS record now you have to add your domain name to blogger.

  • So go to your blogger account.
  • Go to  Setting >> Publishing.
  • Now click on Custom Domain option.
  • Click on Switch to advance setting.
  • enter your domain name as : www.yourdomain .com.
  • insert verification code.
  • now check mark on “Redirect yourdomain.com to www.yourdomain.com”.

That’s it you are done with your custom domain.

Important Note : It will take some time for domain name to work as yourdomain.com

How to add an Existing Domain Name with Blogger

1. Own a domain with DNS, so register your domain with DNS. Make note of the login DNS settings page for the domain.

2. Edit the domain settings to add a record: (Fully Qualified Domain Name: www, Record Type:CNAME, Record Value: ghs.google.com)

3. Log in to Blogger and go to "Settings" tab.

4. Go to "Publishing" settings.

5. Click the button " Custom Domain"

6. Under the “Buying a domain for your blog”, to the right under “Already have a domain?’, click Switch to Advanced Settings.

7. For Domain name, enter domain using the “www.” But without the “http://” as in www.mydomain.com

8. Enter the word verification

9. View Blog to see if your blog comes up. It is normally as immediate update.

10. From the publishing tab, click the check box for redirecting the “non-www” address to the URL with the “www” in it.

11. Enter the word verification

12. Save settings again.

Other Links:

  • How to register Domain name @99/- only
  • How To Add BigRock Domain To Blogger
  • Best ways to increase traffic of website

    There are following ways to increase your website's traffic.Hope you like this. Give your suggestions, views and advice on this topic.

    image

    1.Write more and more content:-
    The best and the most powerful way to increase traffic is by publishing more and more posts which increases interest of users in your website and gives you more traffic.

    2.Have a good design and layout:-
    If your blog's or website's  design is very colorful, sloppy, hard to navigate, colors that don’t match or are hard on the eye, or full of errors, the website traffic will decrease immediately.so make sure you have more and more formal color mostly white color and blue which suits to the eyes of the users.

    3.Guest blog:-
    The best way to increase a good traffic is to Offer to write a post on someone others site. Even better, have the post already written up,then let the blogger know you have a post ready to guest blog on their site.When you write your guest blog post, find a post on your own blog that’s related and link to in your guest blog post. A link for you on their blog, and more ability to increase site traffic.

    4.search engine optimization:-
    The most important and best easy and best used way to increase free traffic at  a big level is seo,which incraeses your traffic on regular basis and free.so sign up for seo's.or webmasters like google,bing,baidu etc which will help in increasing your traffic constantly and free.

    5. Increase Backlinking:-
    To increase traffic and more and more impressions comment on other website and get more and more backlinks but remember your comments should be related to topic of that website.

    6.Make use of youtube:-
    Make an acoount on youtube and then on your profile where you can list your website address,list your website's link there,then start uploading videos.when people will see your profile,can open your website.

    7.social website linking:-
    Make use of the social sites like, facebook, twitter, stumbleupon, reddit, newsvine etc and submit your link on these websites it will help in getting more and more traffic.

    Aakash 2 is launching, Future of Aakash 2 is

    As the world’s cheapest tablet gets ready to become completely indigenous, speculation over the practicality of its production is gaining new grounds.

    image

    The HRD ministry recently announced that Datawind- the company that has been responsible for producing Aakash, will no longer be associated with the project. Spats between Datawind and IIT Rajasthan over specifications of the tablet became a matter of public interest when Datawind accused IIT Rajasthan of asking it to comply with constantly changing specifications. Datawind, on the other hand has been held responsible for not being able to produce the tablets at a rate sufficient to meet the government’s requirements.

    Issues also arose over the quality of tablets, with the testers (mostly IIT students) complaining that it was too slow, had a weak battery and insufficiently sensitive resistive screen.

    Datawind also drew the HRD ministry’s ire over its decision to offer the tablet in the open market before providing it to the government. Datawind’s commercial version of Aakash –UbiSlate 7 was released in December last year and became an instant hit with the public.
    The Centre for Development of Advanced Computing(C-DAC) and the Industrial Training Institutes(ITIs) have now been roped in for the Aakash project along with the IITs. The tenders for production of the next version of Aakash will soon be floated; HCL has already expressed its interest in bidding for the project.

    The cost of the new tablet is expected to remain the same (around $ 49), even as its quality is expected to improve significantly. The price is expected to fall even further as the demand for the tablet increases and the government moves closer to its target of providing a tablet to every child of the country.

    The new tablets are also expected to carry the “Made In India” tag as the project becomes completely indigenous. To this front, three new IITs have now been involved.

    Aakash 2 is expected to be out by April this year. Whether that deadline is met amidst all the controversy, is another matter entirely.

    How to cancel an e-ticket directly by an email

    For cancelling an e-ticket, you need to login to your irctc account and complete a lengthy cancellation process.

    This is tiring as the website is usually very busy and WebPages take long time to load.

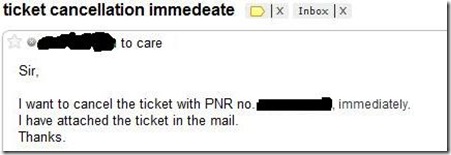
    But there is an absolutely easy way of doing the same. Its by directly sending an email to etickets@irctc.co.in from registered email address(one that’s in irctc profile).

    For cancelling an e-ticket, one just needs to write e-ticket’s PNR number, information regarding the issue, and send it to etickets@irctc.co.in.

    mail

    Attaching a copy of e-ticket is better but its not mandatory.

    On successful cancellation of e-ticket, an acknowledgement email is then sent back informing the user about it.